It is known that plants requirements can give us basic information about proper cultivation of aquatic plants. We should know where plant grows in the nature (continent), in which climate zone in which type of water and to which group they belong (water plants, mud plants, floating). The area of occurrence is an indication of the light time that is required. 12 hours for the plants from the equator and length increases with increasing the latitude. Climate zone is an indication of the proper water temperature. We also need to remember not to allow plants to grow above the surface as they may lose their underwater leaves. You need to systematically remove dead parts and leafs.
Under artificial conditions plants rarely bloom and usually we do vegetative reproduction. This can be done in different ways: by dividing rhizomes, with runners, by growing propagule, tubers, roots, by fragmentation, etc. Plants will adopt quickly due to their ability to regenerate.

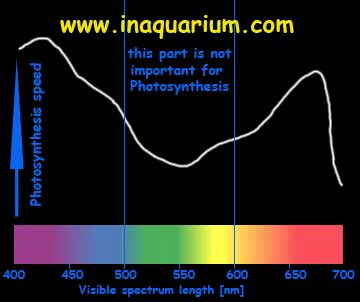
When it comes to plant breeding is not a secret that for proper photosynthesis the best are light waves 400-450nm and 650-700nm, and the waves of length 550nm are not important for photosynthesis. The following graph shows the dependence of light wavelength on the photosynthesis process:
Amount of such light by using fluorescent lamps should be around 0.5 W/litre. In addition, I recommend you read another article on our website about aquarium lighting . You'll find there information about the light parameters, fluorescent light types, types of lighting used in the aquarium hobby. I recommend also to read the fluorescent models on the market. You'll find the most popular models, their lengths, types (T5, T8 and T5 with length of T8) and their spectrum which will help you to select the right light for you.
With the proper lighting and the availability of nutrients to plants in the form of manure excreted by fish and carbon dioxide also produced by fish, you may find that the plants do not want to grow. The probable reason for this is not enough nutrients. This happens quite often if there is a lot of plants in the aquarium. Fish are not able to supply enough nutrients. The simplest solution for this situation is is to use an additional source of CO2. This is done by connecting the cylinders of compressed carbon dioxide to the diffuser placed in the aquarium. You should also keep a certain proportion of the amount of CO2, otherwise it may end tragically for fish. Read the article about CO2 Carbon dioxide in the aquarium. There you will find information about how carbon dioxide affects the pH of the water and what quantities are recommended for fertilization.
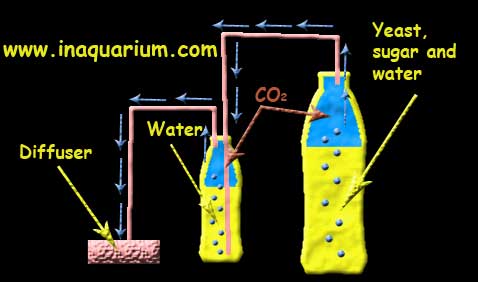
CO2 fertilization system can be purchased in the shop (canisters with compressed gas) or you can make one by yourself. The ones made by yourself perfectly fulfill smaller tanks. You can always do two stations to supply a larger tank. Construction of a homemade carbon dioxide fertilization system is very simple. Consists of two plastic bottles connected by pipes. An example is shown below:

So you need two bottles (2L and 0.5 L) with caps. We make a hole in large bottle cap to put a pipe in it. We slide the pipe into the bottle for around 1 centimeter (can not touch the mash). In the cap of small bottle we need to do two holes - one for a pipe from big bottle and second one which goes to the diffuser. The pipe which goes to the diffuser should be as high as possible so it does not touch the water surface. Pipes need to be sealed with silicon so the carbon dioxide does not leak (please leave silicon to dry for about 24-48h). To prepare the mash we use 100 grams of yeast, 400g sugar and 1L of warm water. Shredded yeast must be dissolved in the water. Do the same with the sugar and pour it in to the 2L bottle. Add some more water to fill the bottle. It takes about 30 minutes to several hours before our installation will provide carbon dioxide to the aquarium. Operating time varies from one month to six weeks.The advantages of such installation are low operating costs. The downside is that the production of carbon dioxide is continuous and we need to keep an eye on the water pH so it does not drop too low. It is important especially at night when plants also produce carbon dioxide CO2.
If you have good lighting, proper pH and the amount of CO2 and your plants do not grow it could mean that you have lack micro-nutrients such as iron and manganese Mn Fe and Cu Calcium. The commonly available fertilizers for aquatic plants should have balanced quantities of those elements. Tablets may also be inserted into the substrate to give our plants more minerals.